Yesterday after filling all fluids, priming the oil, checking for leaks, fixing leaks, re-filling, checking for leaks, we finally were ready to turn the key and in short order got our Eurovan TDI started. Started very easily and no codes present after several mins of running. All told a very nice end to a long week. We've got a couple bits of minutia (warm up re-torque routine, exhaust hook up and adjusting shift linkage) to tie up but once we do that we'll be on the road. The bigger thing we have to tackle is cleaning up the shop once this is out the door since it's a total wreck right now!
Final install pics coming soon.
Justin
Saturday, May 29, 2010
Wednesday, May 26, 2010
gnat's hair away
I've been a bit distracted by other needs at the shop over the past few days. We've got to keep our paying customers happy and on the road if we're gonna finance these fun side projects...
We finally figured out the vexing electrical issue we were dealing with on Mon, after 2.5 days of head scratching, UK T4 forum searching and wiring diagram studying. Our TDI wiring guru John systematically went through the instrument cluster wiring schematics comparing the Passat TDI to the 93 EV and at the end of a long day figured it out. Way to go John!
Now the TDI cluster is completely working and fits like a glove in the dash. No mods necessary to fit it--just drops right in and secures with the stock screws. It's also an nice upgrade with the digital mileage/odometer and check eng light/glow plug light already built in. My only complaint is this cluster is from a TDI with 198k on it and my EV only has 138k, so I'll be hunting for a lower mileage one...
We also installed the EGT (exhaust gas temp, AKA pyrometer) gauge on the dash yesterday in one of the blanks on the dash by the stereo. This gauge install looks nice and stock and I'm very pleased.

At present I'm working on the intercooler (IC) radiator mounting, and still have the upper mount to fab. This is going behind the L headlight. After that it's just wiring up the IC rad fan and aux water pump for this independent coolant circuit. I'm planning on wiring the fan and pump to be triggered by an adjustable (3-20psi) Hobbs type pressure switch tripped by boost pressure. The circuit will also have one of our adjustable timer delay relays (6-300s DOB) so that when the Hobbs switch tells the fan/pump to shut off it will be delayed a pre-set length of time in order to deal allay any heat soak issues.
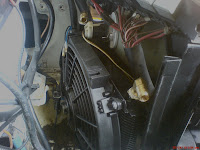
IC radiator/fan

Intercooler plumbed and awaiting coolant circuit
We finally figured out the vexing electrical issue we were dealing with on Mon, after 2.5 days of head scratching, UK T4 forum searching and wiring diagram studying. Our TDI wiring guru John systematically went through the instrument cluster wiring schematics comparing the Passat TDI to the 93 EV and at the end of a long day figured it out. Way to go John!
Now the TDI cluster is completely working and fits like a glove in the dash. No mods necessary to fit it--just drops right in and secures with the stock screws. It's also an nice upgrade with the digital mileage/odometer and check eng light/glow plug light already built in. My only complaint is this cluster is from a TDI with 198k on it and my EV only has 138k, so I'll be hunting for a lower mileage one...
We also installed the EGT (exhaust gas temp, AKA pyrometer) gauge on the dash yesterday in one of the blanks on the dash by the stereo. This gauge install looks nice and stock and I'm very pleased.

At present I'm working on the intercooler (IC) radiator mounting, and still have the upper mount to fab. This is going behind the L headlight. After that it's just wiring up the IC rad fan and aux water pump for this independent coolant circuit. I'm planning on wiring the fan and pump to be triggered by an adjustable (3-20psi) Hobbs type pressure switch tripped by boost pressure. The circuit will also have one of our adjustable timer delay relays (6-300s DOB) so that when the Hobbs switch tells the fan/pump to shut off it will be delayed a pre-set length of time in order to deal allay any heat soak issues.

IC radiator/fan

Intercooler plumbed and awaiting coolant circuit
Tuesday, May 18, 2010
Intercooler system/AC system
Here's the first mock up of my water-to-air intercooler sitting behind the intake manifold with blue silicone hoses on either side:

I had the IAT sensor port, as well as a 1/8" NPT port for MAP hose welded onto the intake manifold 'barb' since it was long enough to accomodate that. Overall, very short run of charge pipes and should make for a very efficient intercooler--especially since it's rated for 300+HP engines.
Ran into the first significant hitch with the conversion, which is fairly minor overall: The TDI AC compressor has different port sizes than the EV AC lines. I tried to swap the rear end of the AC comps (EV to TDI), but they are too different to make them work this way. Tomorrow I will try to modify the EV comp to work on the TDI alternator/compressor bracket, so there's still hope that it will be relatively painless.
Coolant system is finished as of today. I ended up setting it up as a merger between the two systems, 4-cyl EV and AHU TDI, since neither way would work without adapting one to the other. In the end it's fairly slick and uses the stock TDI hose config. on the front of the engine, an A1 coolant hose turned 180* towards the frt of the engine, the TDI coolant pipe (that returns coolant from the cabin heater to the water pump), stock 5-cyl aux. 12v water pump, and three additional fittings: one 3/4" tee and one 3/4" wye fitting, and one 5/8" plug.
 Lwr rad hoses, 5-cyl EV on bottom
4-cyl EV on top; The 5-cyl hose has been modified slightly with a 39mm trim off the water pump end. With this mod it can be used on the 4-cyl TDI engine.
 Upper rad hoses, 5-cyl EV on bottom, 4-cyl EV on top. These are different enough to warrant use of 4-cyl EV one, though it is feasible to mod the 5-cyl EV one enough to make work on the 4-cyl engine.
The only major system remaining is the fuel system and luckily that's our specialty. If all goes well finishing up the electrical it should be running tomorrow or thurs.

I had the IAT sensor port, as well as a 1/8" NPT port for MAP hose welded onto the intake manifold 'barb' since it was long enough to accomodate that. Overall, very short run of charge pipes and should make for a very efficient intercooler--especially since it's rated for 300+HP engines.
Ran into the first significant hitch with the conversion, which is fairly minor overall: The TDI AC compressor has different port sizes than the EV AC lines. I tried to swap the rear end of the AC comps (EV to TDI), but they are too different to make them work this way. Tomorrow I will try to modify the EV comp to work on the TDI alternator/compressor bracket, so there's still hope that it will be relatively painless.
Coolant system is finished as of today. I ended up setting it up as a merger between the two systems, 4-cyl EV and AHU TDI, since neither way would work without adapting one to the other. In the end it's fairly slick and uses the stock TDI hose config. on the front of the engine, an A1 coolant hose turned 180* towards the frt of the engine, the TDI coolant pipe (that returns coolant from the cabin heater to the water pump), stock 5-cyl aux. 12v water pump, and three additional fittings: one 3/4" tee and one 3/4" wye fitting, and one 5/8" plug.

4-cyl EV on top; The 5-cyl hose has been modified slightly with a 39mm trim off the water pump end. With this mod it can be used on the 4-cyl TDI engine.

The only major system remaining is the fuel system and luckily that's our specialty. If all goes well finishing up the electrical it should be running tomorrow or thurs.
Friday, May 14, 2010
Pics from the conversion den
Today we made some big progress on the TDI wiring install. Here are some scenes from the day:
EV fuse block hanging down and harness being interfaced

My TDI wiring expert and right-hand man John installing TDI harness to fuse block

Here's a random shot of the chaos that envelopes you when you tackle a conversion like this

and the sum total of the EV wiring harness that is being yanked

One other note: we also got the PS high press. banjo connected to the PS pump with no mods necessary. As noted previously the low pressure hose (from PS reservoir to PS pump) needs to be removed and replaced with a slightly longer hose to reach the fitting.
EV fuse block hanging down and harness being interfaced

My TDI wiring expert and right-hand man John installing TDI harness to fuse block

Here's a random shot of the chaos that envelopes you when you tackle a conversion like this

and the sum total of the EV wiring harness that is being yanked

One other note: we also got the PS high press. banjo connected to the PS pump with no mods necessary. As noted previously the low pressure hose (from PS reservoir to PS pump) needs to be removed and replaced with a slightly longer hose to reach the fitting.
Thursday, May 13, 2010
inch by inch
Today was like being on a roller coaster, and like being on a roller coaster, there's not much time for pics. The highs were exhilarating and the lows were a bit of a gut shot. John and I had to run over the new old shop to pick up the TDI engine on deck for our next conversion, and that whiled away a bunch of time scheming on the next big thing: 2.0l PD install in a Vanagon or Eurovan. We had a good time though and I got all hopped up on coffee which helped fuel my roller-coaster all day.
Once we got back to the shop we determined that both the AC compressors we have in our quiver (the stock 5-cyl gas one and the AHU one), had issues and we needed to get another one coming, so John had to run over to the wrecking yard. We then had 1-2 good hrs putting back together the front suspension on the EV that we had taken apart to for some basic service that had been deferred for far too long. Here's the list:
* new front wheel bearings
* new upper and lower ball joints
* rotors turned, re-installed
* CV joints de-greased/cleaned/repacked/installed
While John was out I started on the EV coolant system and was pleased to discover that the lwr radiator hose on the stock EV 2.5l gas engine fits the 4-cyl engine with very simple mods: trim ~39mm
off the t-stat cover end of the hose, and use a A1/A2 90* t-stat cover on the water pump and it fits like the stock 5-cyl. one.
Also, FYI, the 5-cyl gas engine alternator is a bolt-in swap on the 1Z/AHU TDI
engine, and the AC compressor *could* be made to work, but uses a different
mounting ear strategy than the TDI (captive threaded 'slider' nuts in the eng.
bracket, not in the comp. like on the TDI), so the TDI comp. is a better bet.
Also, installed the PS pump and belt and as long as it clears the belly pan, all
will be well in that domain. The only mod necessary here is to remove the low
press. hose off the PS reservoir and install a slightly longer (maybe 3") PS
rated hose to attach to the low press. side of the TDI PS pump. The high
pressure side with the banjo fitting attached looks like it will bolt right onto
the TDI pump, so no problem there.
Later in the afternoon our last TDI Vanagon conversion customer came in with his Syncro for service and that occupied the rest of the afternoon. And now mophius calls...
justin
Once we got back to the shop we determined that both the AC compressors we have in our quiver (the stock 5-cyl gas one and the AHU one), had issues and we needed to get another one coming, so John had to run over to the wrecking yard. We then had 1-2 good hrs putting back together the front suspension on the EV that we had taken apart to for some basic service that had been deferred for far too long. Here's the list:
* new front wheel bearings
* new upper and lower ball joints
* rotors turned, re-installed
* CV joints de-greased/cleaned/repacked/installed
While John was out I started on the EV coolant system and was pleased to discover that the lwr radiator hose on the stock EV 2.5l gas engine fits the 4-cyl engine with very simple mods: trim ~39mm
off the t-stat cover end of the hose, and use a A1/A2 90* t-stat cover on the water pump and it fits like the stock 5-cyl. one.
Also, FYI, the 5-cyl gas engine alternator is a bolt-in swap on the 1Z/AHU TDI
engine, and the AC compressor *could* be made to work, but uses a different
mounting ear strategy than the TDI (captive threaded 'slider' nuts in the eng.
bracket, not in the comp. like on the TDI), so the TDI comp. is a better bet.
Also, installed the PS pump and belt and as long as it clears the belly pan, all
will be well in that domain. The only mod necessary here is to remove the low
press. hose off the PS reservoir and install a slightly longer (maybe 3") PS
rated hose to attach to the low press. side of the TDI PS pump. The high
pressure side with the banjo fitting attached looks like it will bolt right onto
the TDI pump, so no problem there.
Later in the afternoon our last TDI Vanagon conversion customer came in with his Syncro for service and that occupied the rest of the afternoon. And now mophius calls...
justin
Tuesday, May 11, 2010
Go day
Yesterday was go day in the diesel shop. We had a few loose ends to tie up in the AM, and a business meeting till 3pm, but then it was finally time to install the new powerplant into my 93 Eurovan. Here's a pic of the dressed engine w/VR6 clutch disc/pressure plate just before mating to the transmission:

We also did the final install of the 4-cyl Eurovan dipstick and it went remarkably smooth with only slight mods being necessary to the upper and lower mounting tabs on the dipstick tube. Due to the angle of the engine in the Eurovan, the dipstick enters the engine from the rear and the blockmust be drilled out to accept the OEM dipstick. This is made easier by the fact that the 1Z/AHU TDI engines have the flattened boss in the block already, so it just needs to be drilled out to accept the dipstick. Here's a couple pics of the dipstick installed.
Dipstick on left side of engine going up at a diagonal.


detail of the lower dipstick mounting flange
Another notable thing worth mentioning here is the R side engine bracket for the 4-cyl engine. This bracket is special ordered from VW of Europe and was the bracket used on all 4-cyl EV installations. The original 1Y/ABL 4-cyl engines (1.9/1.9TD) that came in the EV in europe had 10mx1.5 bolt holes where this mount attached to the block, but the 1Z/AHU TDI engines have two 8m and one 6m holes here instead, so these must be drilled out using a 8.5mm drill bit and then tapped with a 10mx1.5 tap. The top hole is drilled all the way through, and the other two only as deep as they were originally. In order to stay consistent, we used the factory spec bolts for holding the bracket to the engine block, 68mm long for the top on, 48mm long for the bottom two:
 4-cyl mount in foreground with 3 mounting bolts w/multi-splined heads visible. The bottom one is also shared with the lwr T-belt cover.
 Close up of mounting bolts. The bottom bolt fastens the lower timing belt cover. This cover is specific to the 4-cyl EV engine install so must be used.
 In the pic to the right, notice how the bellhousing has extra bolt holes above the bolts holding it to the engine. This made is so the 02B transmission could be mated to the 4-cyl or 5-cyl engines. VW is sometimes very clever.

This pic has the appearance of an engine way down at the bottom of a well, but that's the 4-cyl TDI engine installed in the Eurovan. Lots of room on all sides of this engine, so hopefully servicing the engine will be a bit more humane compared to the 5-cyl engine.

We also did the final install of the 4-cyl Eurovan dipstick and it went remarkably smooth with only slight mods being necessary to the upper and lower mounting tabs on the dipstick tube. Due to the angle of the engine in the Eurovan, the dipstick enters the engine from the rear and the blockmust be drilled out to accept the OEM dipstick. This is made easier by the fact that the 1Z/AHU TDI engines have the flattened boss in the block already, so it just needs to be drilled out to accept the dipstick. Here's a couple pics of the dipstick installed.
Dipstick on left side of engine going up at a diagonal.


detail of the lower dipstick mounting flange
Another notable thing worth mentioning here is the R side engine bracket for the 4-cyl engine. This bracket is special ordered from VW of Europe and was the bracket used on all 4-cyl EV installations. The original 1Y/ABL 4-cyl engines (1.9/1.9TD) that came in the EV in europe had 10mx1.5 bolt holes where this mount attached to the block, but the 1Z/AHU TDI engines have two 8m and one 6m holes here instead, so these must be drilled out using a 8.5mm drill bit and then tapped with a 10mx1.5 tap. The top hole is drilled all the way through, and the other two only as deep as they were originally. In order to stay consistent, we used the factory spec bolts for holding the bracket to the engine block, 68mm long for the top on, 48mm long for the bottom two:


This pic has the appearance of an engine way down at the bottom of a well, but that's the 4-cyl TDI engine installed in the Eurovan. Lots of room on all sides of this engine, so hopefully servicing the engine will be a bit more humane compared to the 5-cyl engine.
Saturday, May 8, 2010
Almost there!
Had a short week in the shop on account of a cross-country road trip with my mother (MA to OR 3177 miles). She's moving out here to Oregon so I flew out to help her with the move. I flew into Mass. on May 1 (Sat. night) at 12am and we hit the road at 11:30am on Sun. We drove non-stop on I-90 until Sioux Falls, SD (~27hrs at 70-75mph) where we got a room and some much needed sleep for the night. Then another 13.5hrs got us into Butte, MT the next night where we got a room. The next day was the most interesting part of the trip up through NW Montana on I-90 and down through the Idaho panhandle. Another 13hrs got us back to Corvallis around 6:45pm on Wed night.
Back in the shop on Thurs/Fri and playing catch up on orders and phone calls and what not. Only got a few hours in on the EV project, mostly small things like torquing the crank shaft bolt, installing the euro T4 oil pump and oil pan. I also installed the new K03/04 hybrid turbo and oil feed/return lines, valve cover and the 120A alternator. Also installed a clutched pulley on the alternator (FWIW). Received the VR6 clutch disc and pressure plate (higher clamping force than the TDI one) as well as the new timing belt/tensioner/roller, so hopefully I'll have some time this weekend to install those and time the engine. All in all it's starting to look respectable:


Back in the shop on Thurs/Fri and playing catch up on orders and phone calls and what not. Only got a few hours in on the EV project, mostly small things like torquing the crank shaft bolt, installing the euro T4 oil pump and oil pan. I also installed the new K03/04 hybrid turbo and oil feed/return lines, valve cover and the 120A alternator. Also installed a clutched pulley on the alternator (FWIW). Received the VR6 clutch disc and pressure plate (higher clamping force than the TDI one) as well as the new timing belt/tensioner/roller, so hopefully I'll have some time this weekend to install those and time the engine. All in all it's starting to look respectable:


Saturday, May 1, 2010
T4 4-cyl mounting brackets installed

This is a pic of the bracket that supports the long R final drive "arm" of the transmission. This bracket is specific to the 4-cyl T4 engine.

To the far right of the engine you can see the R engine mounting bracket, specific to the 4-cyl T4 engine.

Front of engine now with water pump/alternator bracket/injection pump bracket installed. The the left you can see the 4-cyl T4 specfic engine mount bracket.
Had a bit of a wacky day yesterday since I had to move a bunch of VW parts out of my storage unit and back over to my old shop where I will be operating out of again within the next 1-2 months. I will be out of town for the next few days helping my mother move cross country, but once I get back we'll be in the home stretch of the conversion.
Thursday, April 29, 2010
AHU TDI engine build
Today turned out great after a slow start with at trip with Grover (my blue 85 F250) down to the shipping terminal in Eugene to pick up a TDI engine/peripherals for my next TDI conversion project. The afternoon was all about finishing the build of the TDI engine that will be going in my Eurovan. Here's some pics of the process:
Short block fitted with new 79.97mm Nural pistons. Block bored/honed to 80.01mm. New wrist pin bushings, I-shaft bearings, Glyco rod and main bearings. Sexy.

And with Raceware studs installed. Very sexy.


My intention with this engine build and project is to maximize performance and build a sort of a "show vehicle" Eurovan so people can see what the potential of this engine in a Eurovan is. Any time an engine is being built for above stock power output, head studs are a smart investment to keep that head 'glued' to the block under high boost/high power output levels. Otherwise regular old TDI spec head bolts are perfectly fine to use.
Measuring piston height projection--a sun smote on the dial indicator face, a sign from the VW divinity?

Now it's time to start dressing the head. We ship all our heads to Aluminum Head Rebuilders in Portland, OR for complete OE spec rebuilds. They're the best in the biz--period.


Long block stage. Head gasket is installed on block, head is installed, torqued to spec and peripherals attached.

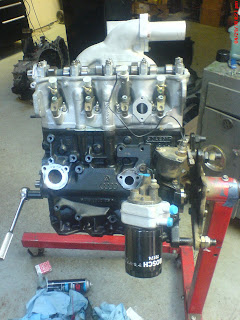

All in a days work!
Short block fitted with new 79.97mm Nural pistons. Block bored/honed to 80.01mm. New wrist pin bushings, I-shaft bearings, Glyco rod and main bearings. Sexy.

And with Raceware studs installed. Very sexy.


My intention with this engine build and project is to maximize performance and build a sort of a "show vehicle" Eurovan so people can see what the potential of this engine in a Eurovan is. Any time an engine is being built for above stock power output, head studs are a smart investment to keep that head 'glued' to the block under high boost/high power output levels. Otherwise regular old TDI spec head bolts are perfectly fine to use.
Measuring piston height projection--a sun smote on the dial indicator face, a sign from the VW divinity?

Now it's time to start dressing the head. We ship all our heads to Aluminum Head Rebuilders in Portland, OR for complete OE spec rebuilds. They're the best in the biz--period.


Long block stage. Head gasket is installed on block, head is installed, torqued to spec and peripherals attached.

Engine is fitted with factory Bosch T4 TDI injectors from Germany with .216 nozzles (basically PP764s). These came on the 5-cyl 150hp TDI engine in Europe. The intake manifold is a high flow intake from a PD150--the highest power output 4-cyl TDI engine out there, but not necessary to fit in a Eurovan. Exhaust manifold is stock AHU with EGR delete blocking plate and pre-turbine EGT probe, both non-essential features for the EV installation.


All in a days work!
Wednesday, April 28, 2010
02B 5th gear swap
Today was rather truncated due to family needs, but I was able to dive into the 02B tranny and swap the 5th gear set with the passat 02A tranny giving me a .756 5th instead of the EV .837.
Here's how it unfolded:
02B on left, 02A on right, with 5th gear cover the black cover with the VW logo.

Next it's off with the covers. 5th gear set sitting high and proud.


Here's the syncro slider hub pivot bolt being removed. Both pivot bolts must be removed (triple square head, 18 ft/lb torque spec) as well as the attachment point at the shift lever which requires a long T45 bit (also 18 ft/lbs).

 Slider hub still attached to gear set.


Slider yoke removed. Next step is to take off the slider hub, but first it is wise to mark (1, 2, 3) the 3 locating tabs along with which slot they are riding in. Always reassemble the same way it came apart! Next remove the light duty C-clip that rides inside these tabs.
Next it's time to use the impact wrench to remove the big T60 bolt holding both the main gear set
 and the layshaft gear to their shafts. These are fairly tight (59 ft/lbs) and there's no good/easy way to keep the gears from turning, so the impact gun makes for handy removal. Once the bolts are off, time for the gear puller. The gears come off relatively easy and may even come off just by heating to 100*C. Be very careful not to break the teeth of the gear upon removal! They are fairly brittle in composition. Also, they have an alarming looking concentric notch (1 to 3 in each gear) in every tooth of the gear. This is normal and must be for even oil distribution while operating.

 Main gear set removed, now it's time for the smaller gear. This one is a bit tighter fit to get a gear puller in place, especially on the 02B trans. since it is a few mm larger and space is limited. Be careful again not to break the teeth off! They are very fragile!!
Once you get this gear off, you can do the same procedure all over again on the 02A trans to get the 5th gears you need. Then you need to install it in the 02B trans, reversing this order of operations. Couldn't be easier right?
Here's how it unfolded:
02B on left, 02A on right, with 5th gear cover the black cover with the VW logo.

Next it's off with the covers. 5th gear set sitting high and proud.


Here's the syncro slider hub pivot bolt being removed. Both pivot bolts must be removed (triple square head, 18 ft/lb torque spec) as well as the attachment point at the shift lever which requires a long T45 bit (also 18 ft/lbs).

 Slider hub still attached to gear set.

Slider yoke removed. Next step is to take off the slider hub, but first it is wise to mark (1, 2, 3) the 3 locating tabs along with which slot they are riding in. Always reassemble the same way it came apart! Next remove the light duty C-clip that rides inside these tabs.
Next it's time to use the impact wrench to remove the big T60 bolt holding both the main gear set

 and the layshaft gear to their shafts. These are fairly tight (59 ft/lbs) and there's no good/easy way to keep the gears from turning, so the impact gun makes for handy removal. Once the bolts are off, time for the gear puller. The gears come off relatively easy and may even come off just by heating to 100*C. Be very careful not to break the teeth of the gear upon removal! They are fairly brittle in composition. Also, they have an alarming looking concentric notch (1 to 3 in each gear) in every tooth of the gear. This is normal and must be for even oil distribution while operating.
 Main gear set removed, now it's time for the smaller gear. This one is a bit tighter fit to get a gear puller in place, especially on the 02B trans. since it is a few mm larger and space is limited. Be careful again not to break the teeth off! They are very fragile!!
Once you get this gear off, you can do the same procedure all over again on the 02A trans to get the 5th gears you need. Then you need to install it in the 02B trans, reversing this order of operations. Couldn't be easier right?
Subscribe to:
Posts (Atom)

 Posts
Posts