Thursday, April 29, 2010

AHU TDI engine build

Today turned out great after a slow start with at trip with Grover (my blue 85 F250) down to the shipping terminal in Eugene to pick up a TDI engine/peripherals for my next TDI conversion project.  The afternoon was all about finishing the build of the TDI engine that will be going in my Eurovan.  Here's some pics of the process:

Short block fitted with new 79.97mm Nural pistons.  Block bored/honed to 80.01mm.  New wrist pin bushings, I-shaft bearings, Glyco rod and main bearings. Sexy.


And with Raceware studs installed.  Very sexy.


My intention with this engine build and project is to maximize performance and build a sort of a "show vehicle" Eurovan so people can see what the potential of this engine in a Eurovan is.  Any time an engine is being built for above stock power output, head studs are a smart investment to keep that head 'glued' to the block under high boost/high power output levels.  Otherwise regular old TDI spec head bolts are perfectly fine to use.


Measuring piston height projection--a sun smote on the dial indicator face, a sign from the VW divinity?


Now it's time to start dressing the head.  We ship all our heads to Aluminum Head Rebuilders in Portland, OR for complete OE spec rebuilds.  They're the best in the biz--period. 


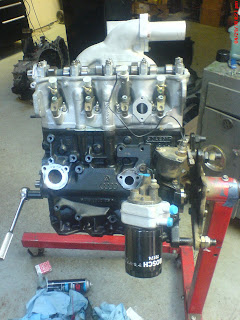
Long block stage.  Head gasket is installed on block,  head is installed, torqued to spec and peripherals attached.

Engine is fitted with factory Bosch T4 TDI injectors from Germany with .216 nozzles (basically PP764s).  These came on the 5-cyl 150hp TDI engine in Europe.  The intake manifold is a high flow intake from a PD150--the highest power output 4-cyl TDI engine out there, but not necessary to fit in a Eurovan.  Exhaust manifold is stock AHU with EGR delete blocking plate and pre-turbine EGT probe, both non-essential features for the EV installation.


 All in a days work!
   

Wednesday, April 28, 2010

02B 5th gear swap

Today was rather truncated due to family needs, but I was able to dive into the 02B tranny and swap the 5th gear set with the passat 02A tranny giving me a .756 5th instead of the EV .837.

Here's how it unfolded:

02B on left, 02A on right, with 5th gear cover the black cover with the VW logo.


Next it's off with the covers. 5th gear set sitting high and proud.


Here's the syncro slider hub pivot bolt being removed. Both pivot bolts must be removed (triple square head, 18 ft/lb torque spec) as well as the attachment point at the shift lever which requires a long T45 bit (also 18 ft/lbs).


Slider hub still attached to gear set.


Slider yoke removed. Next step is to take off the slider hub, but first it is wise to mark (1, 2, 3) the 3 locating tabs along with which slot they are riding in. Always reassemble the same way it came apart! Next remove the light duty C-clip that rides inside these tabs.


Next it's time to use the impact wrench to remove the big T60 bolt holding both the main gear set and the layshaft gear to their shafts. These are fairly tight (59 ft/lbs) and there's no good/easy way to keep the gears from turning, so the impact gun makes for handy removal. Once the bolts are off, time for the gear puller. The gears come off relatively easy and may even come off just by heating to 100*C. Be very careful not to break the teeth of the gear upon removal! They are fairly brittle in composition. Also, they have an alarming looking concentric notch (1 to 3 in each gear) in every tooth of the gear. This is normal and must be for even oil distribution while operating.


Main gear set removed, now it's time for the smaller gear. This one is a bit tighter fit to get a gear puller in place, especially on the 02B trans. since it is a few mm larger and space is limited. Be careful again not to break the teeth off! They are very fragile!!

Once you get this gear off, you can do the same procedure all over again on the 02A trans to get the 5th gears you need. Then you need to install it in the 02B trans, reversing this order of operations. Couldn't be easier right?

Tuesday, April 27, 2010

Back in the saddle


Wow, it's amazing how the time just slips on by. Right through Hawaii, right through the dregs of winter, and right on into spring. Right now I'm very excited about our first Eurovan TDI conversion underway at the moment in the shop. This is on a 93 Eurovan MV Weekender that originally had a 2.5l 5-cyl gas engine and auto transmission and is being fitted with a 4-cyl 1.9TDI engine (AHU code) and a 5-spd manual transmission.