This conversion was a long time coming. Ever since I first purchased an
EV in 2009 (a 93 EVW w/5cyl AAF eng and auto trans) and converted it to a 4-cyl TDI/manual transmission, I have been dreaming of doing a Syncro conversion on my personal EV. Well, time has passed many projects completed and some old nagging saddle spurs geht vorbei. Over the years I completed one tough
T4 02G Syncro conversion on a long wheel base EVC at a difficult time in the shop as well as a
4-cyl TDI conversion on a 95 stock T4 Syncro.
A couple years ago I purchased all of the T4 Syncro parts to complete my own Syncro conversion and before I left for Germany during the Spring of 2014 I sent the 02D syncro trans off to be rebuilt/regeared along with a new A04 donor trans for the gearing to match my TDI powerplant. My patience has been significant and my schedule too full to ever fit this in, but finally I had the excuse I needed: my trans got stuck in 4th gear and ground the 3rd and 4th syncros into a brass slurry. Upon investigation I found that the 5th gear bolt had backed out and was jammed on the inside of the trans cover plate, putting pressure internally on the gears. Luckily 5th gear as well as 3rd and 4th were not damaged and once I got the bolt torqued up and the trans flushed a couple times my wife and I drove it around slowly shifting into 3rd and 4th for a couple of weeks until my schedule opened up last week. So impetus in my back pocket I pulled it into the shop on a Sat., got it up on the lift and pulled the 2wd trans and began the Syncro conversion. Here are the details of the build pics along with the specs of my rebuilt Syncro trans etc.

Build Specs:
Vehicle: 2000 Eurovan 1.9TDI (AHU) w/5spd trans w/417k miles
Transmission: O2D Syncro trans DCY code 4.56 final drive w/ custom gearing from 0A4 trans LUB code (2006 Jetta):
| 1st gear | 34 : 09 = 3,778 |
| 2nd gear | 35 : 18 = 1,944 |
| 3rd gear |
32 : 27 = 1,185 |
| 4th gear | 31 : 38 = 0,815 |
|
5th gear | 30 : 48 = 0,625 |
Rear Differential: CJN code 4.56 final drive w/108mm drive flanges*
Gear oil capacity/info:
02D gearbox / transmission (incl. transfer case/Winkelgetriebe): approximately 3.4l
Rear differential (Hinterachse): approximately 1.0l (fill till full)
I used Swepco 210 80w-140 gear oil for the rear diff and VW G052 spec Fuchs Titan Sintopoid 75W-90 synthetic gear oil for the trans.
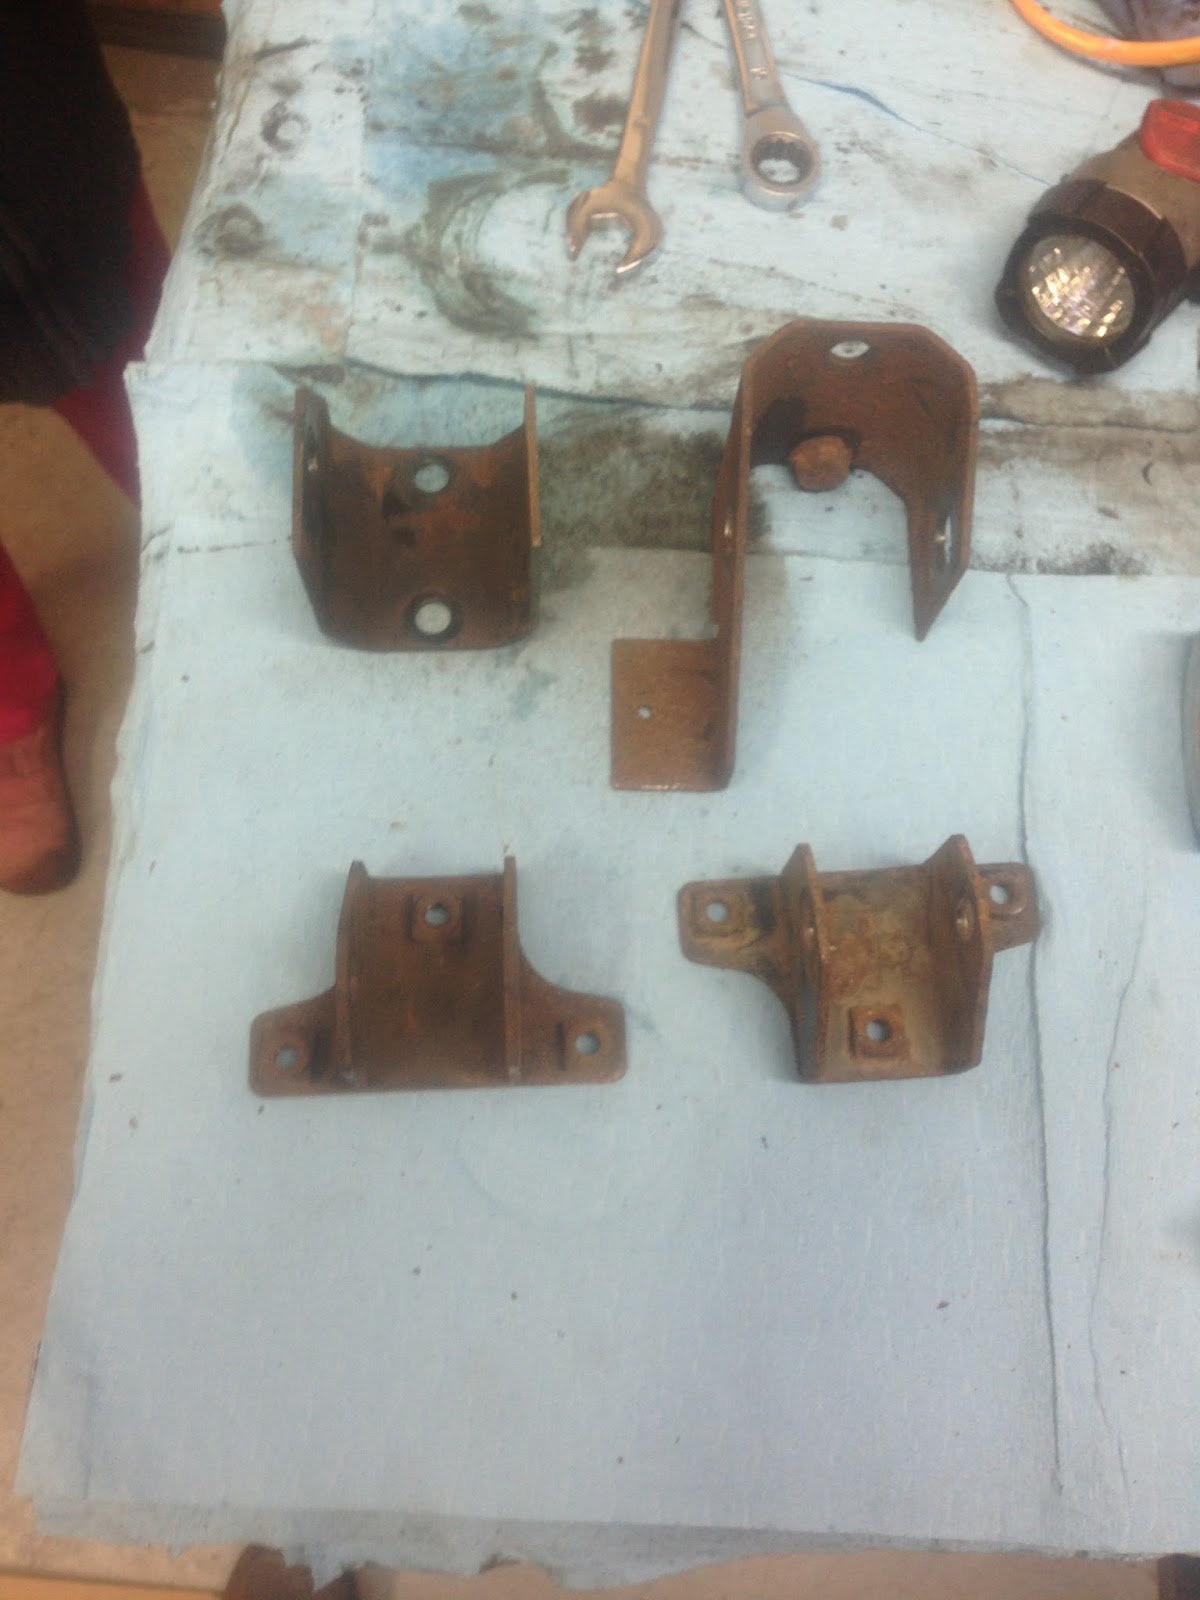
Step 1: prep rusty parts and rusty hardware
The rear diff cross members and brackets were by far the rustiest of the Syncro parts. I decided to give these a proper rust treatment for the long haul: POR-15. This is a time consuming several step process and the paint is virtually impossible to clean once it dries but it is a lifetime treatment and these cross members needed all the help they could get. I started by scraping off the rust flakes, then wire wheeling all surfaces. I neglected to get a before pic but use your imagination.
For the few captive bolts located on these cross members I threaded in some greased up bolts so that no POR-15 paint would bugger up the threads.
For the rusty bolts I used the brass wire wheel on the bench grinder to clean up the threads and the slow and methodical tap set to bring back all the nuts back to service life.
I also cleaned up the drive axle shafts and gave them a quick coat of POR-15 but I didn't end up using these (more later).
 |
| Brackets that hold the rear diff cross members. |
 |
| Rear diff cross members with brackets after scraping off rust and wire wheeling. |
 |
| Rear diff cross members with brackets after scraping off rust and wire wheeling. |
|
 |
| POR-15 treated cross members, brackets and rear drive axles drying. |
 |
| POR-15 treated cross members, brackets and rear drive axles drying. |
|
 |
| POR-15 treated cross members, brackets and rear drive axles drying. |
|
Step 2: remove 2wd trans and install 02D syncro trans.
I should mention here that while I was prepping and rust treating the crossmember and hardware I was also doing the trans R&R and didn't take any pics of that. This is a fairly straight forward swap with engine installed. The most important thing to keep in mind is that the engine must be adequately supported as the 2 trans mounts (L and rear) also support the engine. Also removing the trans with engine in situ is really only possible with the the R side final drive extension ("trumpet arm") removed. The same goes for installing the syncro trans: This was done with the trumpet arm (basically the transfer case on the 02D trans, im Deutsch "Winkelgetriebe) off and this was installed later, once the trans was fully secured to the engine and trans mounts.
 |
| My top helper during the trans R&R heavy lifting. |
 |
| My top helper during the trans R&R heavy lifting. |
|
 |
| DCY 02D syncro trans with "die Winkelgetriebe" removed, new G60 clutch disc test fit on input shaft. |
 |
| 2wd 02B trans that just came out of my van at the top and the fresh 02D at the bottom. |
 |
| Inverse pic of the previous: 02D at the top, 02B at the bottom. |
 |
"die Winkelgetriebe" ready for installation.
|
Step 3: remove exhaust system and trim/remove interfering exh. heat shields and remove spare tire & carrier
I was sort of dreading this stage of the conversion. It's just a big cumbersome unit to take out complete from the downpipe back. Not exactly difficult and not too heavy but just big and awkward to manage and very committal. Having a lift makes this whole operation far simpler....
 |
| This piece of ext. heat shielding had to be trimmed for the rear drive shaft support bracket |
 |
| This piece of ext. heat shielding had to be trimmed for the rear drive shaft support bracket |
|
 |
This heat shield had to geht weg (go away) as it interferes with the rear diff front cross member
|
 |
| Complete exhaust system downpipe back. |
 |
Tough to get a good shot of this:
| Complete exhaust system downpipe back. |
|
 |
| Nature abhors a vacuum ;-), former spare tire location. |
Step 4: install rear differential cross members, new rear shocks and install rear differential
Now things are starting to come together. Laying out the driveline and rear diff/axles brings the vision ever closer. This stage of the conversion is fairly straight forward but still involves some heavy lifting.
 |
| First some prep layout to keep the vision. |
 |
| 3 piece driveline, viscous coupler/rear diff and axle shafts |
 |
| Little did I know at this point that the inner CV joints were the wrong ones! |
 |
| Rear diff and cross members awaiting installation. |
 |
| Rear differential cross member installed. |
 |
| Forward differential cross member installed |
 |
| Time to lower the van down to the hovering differential. |
 |
| Van coming down and diff carefully moved into position. |
 |
| Rear diff bolted up to supporting cross members. |
 |
| Fully bolted and self-supported rear diff. Mid driveline w/carrier bearings installed. |
 |
| View from the front looking back at the viscous coupler (Kupplung) and rear diff (Hinterachse). |
 |
| Rear driveline. |
 |
| Rear driveline installed and bolted up to viscous coupler and mid driveline. |
 |
| New HD Bilstiens to replace the Touring Bilstiens I put on when I originally converted this van to TDI. |
 |
| Rear springs had to be lowered to access one of the cross member bracket bolts and torque to spec. |
Step 5: AXLES!!!!!!!!!!
Ok, this was the first big snag on this conversion. It turns out that the rear drive axles that came with my syncro parts had the wrong inner CV joints installed. The original inner CVJs where replaced long ago by me as the original boots were trashed and the joints beyond restoration. How I failed to notice that the new CVJs were 100mm instead of 108mm and had 8m bolt holes instead of 10m eludes me. I think I was so excited about having new OE VW CVJs from Germany that my vision was fogged and I failed to make note of this obvious problem to come. Suffice it to say I was quite surprised to find out only once the rear diff was installed and I went to install the R side drive axle:
 |
| 100mm CVJ on a 108mm drive flange geht nicht!! |
At this point my syncro project was about to get derailed for months while I await my container from Germany so I started scrounging around the shop for old drive axles. Guess what I found? Several T4 manual trans front drive axles that began looking awfully promising..... And with some loosening of the differential hardware I was able to squeak it over ever so slightly and squeeze in one of these axle shafts. Tire side fit no prob, and diff side had the proper 108mm CVJ and fit handsomely. Wow, what luck!
 |
| Top axle with is the stock T4 syncro rear R side with the 100mm bagged CVJ. Bottom axle shaft looks awfully promising huh? That's from a FWD T4 manual trans, only needs the proper inner CVJ installed. And it has two serviceable joints instead of a sealed outer like the factory T4 rear outer CVJ which only has one, the inner. |
 |
| Inner CVJ installed also from a T4 FWD w/manual trans, 108mm w/10m bolts. |
|
 |
| Front 02B axle shaft installed on rear. Please note the rear axles on this van are experimental and may come back to haunt me!! Also only the CJN and the AYA rear diffs have 108mm drive flanges so this won't work for all. |
Now for the L side..... Nothing even close to the correct length under my benches in my spare parts bins, but I do have all those duplicates of T4 manual trans front axles...... Next I started investigating other possible axle shaft dia and length matches and so I ordered a bunch of random Audi and VW axles from my supplier that had a half a chance.
 |
| Pyramid of new axles, no keepers however. |
After striking out with the low hanging fruit I gave a call to my buddy at the muffler shop and ask him if he's willing to work on this crazy idea: weld two axle shafts together to make one the correct length. He laughs and says "sure but no guarantees!". This is the day before Thanksgiving.... This was time consuming and expensive (less expensive than and way quicker than from Germany though) but worked out very nicely in the end. He had it ready by Monday morning. Made from two T4 M/T front axles, cut to the correct length, ground to points on each end, sleeve of heavy gauge pipe slid over the ends, clamped to a custom vice to keep them true, and then slowly TIG welded for maximum penetration turn by turn. Fitment was even better than the R side! I drove over the mountains to Redmond Oregon with just the R side axle in place and installed this custom axle a coupled days later when I returned. All things considered I would like that R side axle not to be so tightly installed so will work on a long term solution to that. it's not good to have parts like that putting undue tension on other expensive parts (rear diff). I think I might even remove it and shorten the shaft length or at least the joint seat location just a mm or two--that would make me more comfortable. Or worst cast scenario I'll have another custom axle built to get the perfect length. I think even the kerf of the cutting blade cutting this axle in half and then rewelding the butted ends together would be all I need to have the perfect length. TBD...
 |
| Custom built L side rear axle. Wide point in the middle is there the two halves are joined and strengthened by sleeve that is also welded on. |
 |
| This photo is a bit anachronistic, as it's after the new exhaust was built to clear the driveline and this axle. |
 |
| This photo is a bit anachronistic, as it's after the new exhaust was built to clear the driveline and this axle. |
|
Step 6: Driveline final and locker servo vacuum routing and sensor wiring, new exhaust system
Ok, now it's getting close. The front driveline bolted up nice and snugly once I installed the Winkelgetriebe onto the trans. I installed the Winkelgetriebe sans output drive flange shaft due to clearance issues, and then to get the drive flange to clear on install I had to loosen the R torsion bar way down until there was just enough room. Moments of second guessing and considering removing the heavy Winkelgetriebe (but really not wanting to damage the big sealing O-ring by doing so) and re-installing complete with the output shaft, but lowering the torsion bar did the trick, so don't worry it's doabl and I would do it the same way if I did it again.
Earlier in the project I strung out the factory vacuum hoses and locker sensor wires to start getting this sorted. Routing followed factory conventions and at abrasion points I slipped the two tubes into some split loom corrugated tubing, 3/8" ID IIRC. I routed both the vacuum tubes and the wiring harness up and over the fuel tank along the L frame rail leaving tank in situ.
Also had to put back together my dash with the new diff lock control panel....
 |
| Vacuum hoses and sensor wires laid out under van. |
 |
| Business end of wiring. Green plug goes to "D" port behind fuse block, but I found an easier way to integrate. |
 |
| Locker control panel |
 |
| Plug D at fuse block |
 |
| Signal wire for rear diff locker sensor. |
 |
| Signal wire for rear diff locker sensor. |
|
 |
| Rear diff locker sensor plug and vacuum lines installed. |
 |
| Diff locker vacuum lines through firewall. |
 |
| Exhaust routing. |
 |
| Finished exhaust system and Syncro system. |
 |
| View of exhaust clearing L side custom axle. |
 |
| Locker control panel installed. |

 |
|
T4 Syncro conversion finished!
It was a lot of work not without some difficult moments but now it's on the road and sweeter than ever. I'm really happy with the gearing, and the driveline/rear diff is only barely audible. The rear locker is a nice additional touch and adds quite a bit of traction on the icy roads we had earlier today. I'm looking forward to getting into some fun adventures with my girls.
 |
| Syncro side emblem |
 |
|
|
 |
| Rear emblem |
 |
| Rear emblem after icy rain |
****Syncro conversion UPDATE 2/8/2016 420k miles: I
now have over 3000 miles on the syncro conversion including over half
that distance fully loaded and towing a trailer and I am now confident
in the long term functionality of my custom rear axles outlined above.
The one mod I have done is to remove the R side rear axle and shorten
it by approx. 10mm. This was incredibly labor intensive for very little
gain, but the peace of mind it brings and the ease with which this axle
can now be removed and reinstalled was well worth it.
*One thing I learned the hard way: The factory T4 FWD outer CV joint
outer band clamp (GNK/Lobro) interferes with the
rear control arm axle housing. I was able to find a generic clamp of
suitable size at a Napa in Monterey, CA that cleared the housing so I
was able to repair and re-pack with grease on the road.
****Syncro conversion UPDATE 12/5/2021 484k miles:
With 5+yrs and 67k miles now since converting to syncro conversion, here are a few notes to update this build thread:
- Overall
this conversion has been working perfectly with only a few small problems
- There is a bit more road
noise on the highway at 40+mph due to the syncro running gear
- There
is an approx. 4-6 MPG penalty with the syncro over the 2wd. I now get
appox. 24-26MPG on the highway vs. approx. 29-32 MPG before. This is using
primarily B20 fuel year round.
- The Left side custom rear axle has been entirely flawless.
- The Right side custom rear axle that I painstakingly shortened by 10mm (detailed above) should probably be 10-20mm shorter. It's not under any lateral tension and the axle still has enough side to side "float" but the inner R CVJ boot fails about once per year and appears to be under some tension under some road conditions. I just replaced this boot again the other day and for the first time I used a high performance boot from Rockford CV rather than the OE Lobro replacement. It's a substantially tougher and harder rubber (higher durometer) that makes installation more difficult especially in situ, on your back on a cold day in the driveway, but the heat gun and some lube helped me get it on and I'm interested to see if I do get extended longevity from this. I am getting annoyed at this reoccurring problem so I've started considering modding this joint more, or even tracking down an OE one from Europe if I can find one for less than the several hundred $$ I'm currently seeing.